
How to Make a Classic Sour Cream Cake at Home
Indulge in Nostalgia: The Comforting Embrace of a Homemade Sour Cream Cake
Remember those childhood afternoons, the scent of vanilla and warm butter wafting from the kitchen, promising a slice of pure comfort? For many of us, a classic sour cream cake embodies that feeling – a simple yet profoundly satisfying dessert that conjures up memories of family gatherings, shared laughter, and moments of pure, unadulterated joy. There’s something truly magical about a cake that’s both rich and tender, with a delicate crumb that practically melts in your mouth. This isn’t just about baking; it’s about recreating those cherished memories, about bringing a little piece of that heartwarming nostalgia into your own home. Get ready to embark on a baking journey that’s not just about ingredients and instructions, but about rediscovering the simple pleasure of a truly perfect homemade sour cream cake.
Why Sour Cream is the Secret to the Best Cake Ever
Have you ever wondered what gives a truly exceptional cake its remarkable tenderness and rich taste? The secret often lies in a humble ingredient you might already have in your refrigerator: sour cream. When you’re aiming to create a moist sour cream cake with an unbelievably tender crumb and a rich flavor, sour cream isn’t just an addition; it’s a fundamental component that transforms the entire baking experience.
From a baking science perspective, sour cream brings a powerful combination to the table. Firstly, its acidity reacts with baking soda, a leavening agent. This reaction produces carbon dioxide gas, which creates tiny air pockets throughout your batter. These pockets are what give your cake its delightful rise and contribute to that airy, light texture you’re after. Without this crucial interaction, your cake might end up dense and heavy, a far cry from the fluffy goodness you’re aiming for.
Secondly, sour cream is rich in fat. This fat coats the flour proteins, preventing excessive gluten development. Gluten is what gives bread its chewiness, but in a cake, too much gluten can lead to a tough, rubbery texture. By inhibiting gluten formation, sour cream ensures your cake remains incredibly soft and tender. Think of it as a natural tenderizer for your baked goods.
Furthermore, the moisture content in sour cream is higher than that of butter or oil alone. This extra liquid integrates deeply into the batter, ensuring your cake stays moist for days, rather than drying out quickly. This is particularly valuable if you’re baking ahead for an event or simply want to enjoy your delicious creation over several days. The slight tang from the sour cream also subtly enhances the overall flavor profile, adding a complexity that plain milk or buttermilk might not achieve. It’s an acidic ingredient that works wonders for both texture and taste, making it an indispensable element in achieving that classic, coveted cake perfection.
Essential Ingredients for Your Classic Sour Cream Cake
Crafting the perfect sour cream cake recipe begins with gathering the right elements. Each ingredient plays a vital role in the final outcome, contributing to the texture, flavor, and overall success of your baking endeavor. For a truly authentic and delicious outcome, always aim for high-quality components. Here’s what you’ll need for your basic cake recipe:
| Ingredient | Quantity | Notes |
| All-purpose flour | 2 ½ cups | For optimal results and a lighter texture, consider sifting your flour. This removes any lumps and helps aerate it, leading to a more tender crumb in your finished cake. |
| Granulated sugar | 2 cups | This provides sweetness and helps with moisture retention, contributing to the cake’s tenderness. |
| Baking powder | 2 teaspoons | This is a primary leavening agent, responsible for giving your cake its lift and ensuring a proper rise. Ensure it’s fresh for effective results. |
| Baking soda | 1 teaspoon | Working in tandem with the acidity of the sour cream, baking soda reacts to create carbon dioxide, further contributing to the cake’s light and airy structure. |
| Salt | ½ teaspoon | A crucial unsung hero! Salt doesn’t just add salinity; it enhances and balances all the other flavors, preventing the cake from tasting bland or overly sweet. |
| Unsalted butter | 1 cup (2 sticks) | Make sure your butter is softened to room temperature. This is crucial for proper creaming with the sugar, which incorporates air and creates a light batter. |
| Large eggs | 4 | Like the butter, your eggs should be at room temperature. This allows them to emulsify better with the other ingredients, leading to a smoother, more uniform batter and a finer crumb. |
| Sour cream (full-fat) | 1 cup | Opt for full-fat sour cream. This is paramount for achieving maximum moisture, a rich taste, and that characteristic tender texture. Lower-fat versions simply won’t yield the same luxurious results. |
| Vanilla extract | 2 teaspoons | Use pure vanilla extract, not imitation. Its warm, sweet aroma and flavor are essential to the classic taste of this cake. It’s a key element in those comforting, familiar notes. |
Having these pantry staples ready and measured precisely is your first step towards a delightful homemade sour cream cake that will impress everyone.
Step-by-Step Guide to Baking Your Perfect Sour Cream Cake
Now that you have your ingredients assembled, it’s time to dive into the exciting part: baking! This sour cream cake recipe is designed to be straightforward, but paying attention to each step will ensure you achieve that coveted perfection. Follow these sour cream cake recipe steps for a truly satisfying baking experience.
Preparing Your Workspace and Ingredients
Before you even think about mixing, setting up your kitchen properly is key to a smooth baking process.
- Preheat Oven: Begin by preheating your oven to 350°F (175°C). Consistent oven temperature is critical for even baking and proper rising. Use an oven thermometer if you’re unsure about your oven’s accuracy.
- Prepare Pans: Grease and flour two 9-inch round cake pans. You can do this by spreading a thin layer of butter or shortening on the bottom and sides, then sprinkling flour evenly and tapping out any excess. For an extra layer of security and easier removal, you can also line the bottoms of the pans with parchment paper circles.
- Room Temperature Ingredients: This cannot be stressed enough: ensure your butter, eggs, and sour cream are all at room temperature. Cold ingredients don’t emulsify properly, leading to a lumpy batter and a denser cake. Take them out of the refrigerator at least 30 minutes to an hour before you plan to start baking.
Mixing the Dry Ingredients
This simple step ensures that your leavening agents and salt are evenly distributed throughout the flour, leading to a consistent rise.
- Combine: In a large bowl, whisk together your all-purpose flour, granulated sugar, baking powder, baking soda, and salt. Use a balloon whisk to thoroughly combine everything, breaking up any small clumps in the flour.
Creaming Butter and Sugar
This stage is crucial for incorporating air into your batter, which contributes to the cake’s light and airy texture. This is a fundamental baking tip for any great cake.
- Technique: In a separate, larger mixing bowl, use an electric mixer (either a stand mixer with a paddle attachment or a hand-held mixer) to cream together the softened unsalted butter and granulated sugar. Beat on medium-high speed for 3-5 minutes, or until the mixture becomes pale in color, light, and fluffy. It should resemble whipped butter. This process creates tiny air pockets that will expand during baking.
- Gradual Addition: With the mixer on low speed, add the large eggs one at a time, beating well after each addition. Make sure each egg is fully incorporated before adding the next. Scrape down the sides of the bowl as needed to ensure everything is well combined. This step helps create a stable emulsion, preventing your batter from separating.
Alternating Wet and Dry Ingredients
This is where the magic truly begins to happen, transforming your separate components into a cohesive, luscious batter.
- Start and End with Dry: With the mixer on low speed, begin by adding about one-third of the dry ingredient mixture to the butter-egg mixture. Mix until just combined. Then, add half of the full-fat sour cream and mix until just incorporated. Repeat this process: add another third of the dry ingredients, followed by the remaining sour cream, and finally, the last third of the dry ingredients.
- Gentle Mixing: After the last addition of dry ingredients, mix only until just combined. Overmixing at this stage can develop too much gluten in the flour, resulting in a tough and dry cake. As soon as you see no more streaks of flour, stop mixing. A few small lumps are perfectly fine. Fold in the vanilla extract by hand with a spatula until evenly distributed.
Baking and Cooling Your Sour Cream Cake
You’re almost there! Proper baking and cooling are essential for the perfect finished product.
- Even Distribution: Divide your prepared batter evenly between the two greased and floured (or parchment-lined) 9-inch round cake pans. Use a spatula to gently smooth the tops.
- Baking Time: Place the pans in your preheated oven. Bake for approximately 30-35 minutes, or until a wooden skewer or toothpick inserted into the center of the cakes comes out clean or with just a few moist crumbs attached. Baking times can vary depending on your oven, so keep an eye on them. The tops should be golden brown and spring back slightly when gently pressed.
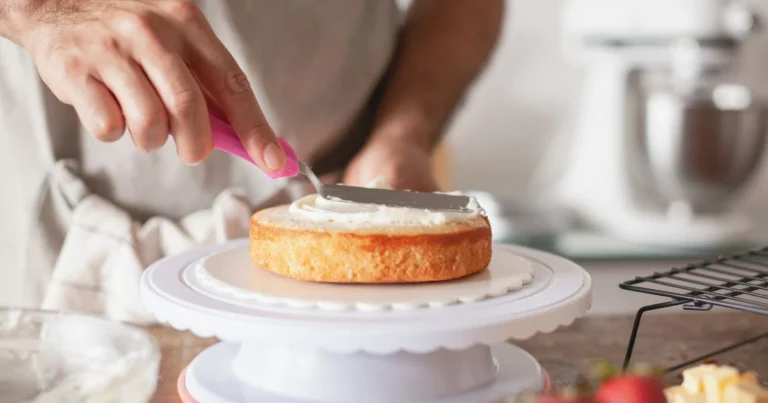
- Cooling Process: Once baked, remove the cakes from the oven and let them cool in their pans on a wire rack for about 10-15 minutes. This allows the cakes to firm up slightly, making them easier to handle. After this initial cooling, invert the cakes onto the wire rack to cool completely. Ensure they are fully cooled before attempting to frost them, as warm cakes will melt your frosting.
By following these how to bake sour cream cake steps meticulously, you’ll be well on your way to enjoying a beautifully baked, perfectly moist, and utterly delicious classic sour cream cake.
Delicious Variations and Toppings for Your Sour Cream Cake
While the classic sour cream cake stands beautifully on its own, it also serves as a fantastic canvas for your creative inclinations. Whether you prefer a traditional finish or want to explore new flavor combinations, these sour cream cake variations and cake frosting ideas will inspire you.
Classic Cream Cheese Frosting
For many, a sour cream cake isn’t complete without a generous slathering of tangy, sweet cream cheese frosting. It’s the perfect complement to the cake’s rich flavor and tender texture.
| Ingredient | Quantity | Notes |
| Cream cheese, softened | 8 ounces | Ensure your cream cheese is completely softened to room temperature for a smooth, lump-free frosting. Use full-fat for the best texture and taste. |
| Unsalted butter, softened | ½ cup (1 stick) | Like the cream cheese, the butter should be thoroughly softened. This allows it to cream properly and incorporate air. |
| Powdered sugar | 3-4 cups | Sift your powdered sugar before adding it to prevent lumps. Adjust the quantity to your preferred level of sweetness. |
| Vanilla extract | 1 teaspoon | Pure vanilla extract adds warmth and depth to the frosting. |
| Milk or cream | 1-2 tablespoons | (Optional) Add gradually, a teaspoon at a time, to achieve your desired consistency. This helps make the frosting smoother and more spreadable. |
Method: In a large bowl, using an electric mixer, beat the softened cream cheese and butter together until light and fluffy, about 2-3 minutes. Gradually add the sifted powdered sugar, one cup at a time, beating well after each addition until fully incorporated. Stir in the vanilla extract. If the frosting is too thick, add milk or cream one teaspoon at a time until you reach your desired consistency. Beat on high speed for a final minute to ensure it’s light and airy.
Other Flavor Enhancements
Beyond the frosting, you can infuse your sour cream cake with delightful new dimensions.
- Lemon Zest: For a brighter, zesty take, add 1-2 tablespoons of finely grated lemon zest to your cake batter along with the wet ingredients. The citrusy aroma and flavor create a refreshing lemon sour cream cake perfect for spring or summer.
- Chocolate Chips: Transform your classic into a rich treat by folding in 1 cup of semi-sweet or dark chocolate chips into the batter during the final mixing stage. This creates a delightful chocolate sour cream cake that will satisfy any cocoa craving.
- Nutty Crunch: Add texture and a deeper flavor by folding in ½ to 1 cup of finely chopped toasted nuts, such as walnuts, pecans, or almonds, into the batter. This provides a delightful crunch with every bite.
- Fruit Swirl: For a burst of fruitiness, gently swirl in ½ cup of your favorite fruit puree or jam (like raspberry, apricot, or blueberry) into the batter before pouring it into the pans. Use a skewer or knife to create delicate swirls for a beautiful marbled effect.
- Spiced Elegance: For an autumnal or winter variation, consider adding 1 teaspoon of ground cinnamon and ½ teaspoon of ground nutmeg to your dry ingredients. These warm spices beautifully complement the richness of the sour cream.
Experiment with these ideas, or let them spark your own culinary imagination. Your classic sour cream cake is ready to be personalized!
Troubleshooting Your Sour Cream Cake: Common Baking Questions
Even experienced bakers encounter challenges from time to time. If your sour cream cake didn’t turn out exactly as planned, don’t despair! Understanding common issues and their solutions can help you perfect your technique for next time. Here are some solutions to frequently asked sour cream cake problems.
Why is My Sour Cream Cake Dry?
A dry cake is one of the most disheartening baking outcomes, especially when you’re aiming for a moist, tender crumb.
- Overmixing: This is a very common culprit. When you overmix cake batter, particularly after adding the flour, you develop the gluten in the flour excessively. Gluten provides structure, but too much makes a cake tough and dry. Remember, mix only until the ingredients are just combined and no streaks of flour remain. A few small lumps are perfectly acceptable.
- Overbaking: Leaving your cake in the oven for too long, even by a few minutes, can drastically dry it out. Pay close attention to the baking time specified in the recipe and start checking for doneness a few minutes before the estimated time. The toothpick test (inserting a wooden skewer into the center of the cake – it should come out clean or with a few moist crumbs) is your best friend here. Also, ensure your oven temperature is accurate; an oven thermometer can be a valuable tool.
- Incorrect Measuring: Baking is a science, and precise measurements matter. Too much flour or not enough wet ingredients (like sour cream or eggs) can throw off the moisture balance. Always use proper measuring cups and spoons, and for flour, it’s best to weigh it with a kitchen scale or use the “spoon and level” method (spoon flour into the measuring cup and level off the top with a straight edge) rather than scooping directly from the bag, which can compact the flour.
Why Did My Cake Sink in the Middle?
A sunken cake can be frustrating, but it’s often due to one of a few common factors related to the cake’s structure during baking.
- Underbaked: The most frequent reason for a cake sinking in the middle is that it hasn’t baked long enough. The center simply hasn’t had enough time to set and fully develop its structure. When you pull it out too early, the fragile, uncooked center collapses as it cools. Ensure your toothpick test is consistently clean before removing the cake from the oven.
- Oven Door Opened Too Soon: Resist the urge to peek! Opening the oven door, especially in the first two-thirds of the baking time, can cause a sudden drop in temperature. This shock can deflate the delicate, rising structure of the cake, leading to a sunken center.
- Expired Leavening Agents: Baking powder and baking soda lose their potency over time. If your leavening agents are old or expired, they won’t produce enough gas to give your cake the necessary lift, causing it to fall. Always check the expiry dates on your baking powder and baking soda and store them in airtight containers in a cool, dry place.
- Too Much Leavening: While rare, using too much baking powder or baking soda can also cause a cake to rise too quickly and then collapse because the structure isn’t strong enough to support the rapid expansion. Always stick to the recipe’s specified amounts.
By being mindful of these troubleshooting baking tips, you can significantly increase your chances of baking a consistently perfect sour cream cake.
FAQs About Making a Sour Cream Cake
You’ve got questions about baking your classic sour cream cake, and we have the answers! Here are some common queries to help you on your baking journey.
Can I use low-fat sour cream for a sour cream cake?
While it’s technically possible to substitute low-fat sour cream in your recipe, we highly recommend sticking with full-fat sour cream for optimal results. The fat content in full-fat sour cream is crucial for achieving that characteristic rich flavor, luxurious moisture, and incredibly tender crumb that defines a classic sour cream cake. Low-fat versions simply won’t deliver the same level of richness and can result in a cake that’s noticeably drier and less flavorful. If you’re looking for the very best sour cream for cake, full-fat is undeniably the way to go.
How long does a sour cream cake last?
A properly stored homemade sour cream cake has a good shelf life, allowing you to enjoy it for several days. If kept at room temperature in an airtight container, an unfrosted sour cream cake will typically stay fresh and delicious for 2-3 days. If your cake is frosted, especially with a cream cheese frosting, it’s best to store it in the refrigerator due to the dairy content of the frosting. When refrigerated, the cake can last up to a week, though it’s often best enjoyed within the first 3-5 days for peak freshness.
Can I freeze sour cream cake?
Absolutely! Freezing is an excellent way to preserve your sour cream cake for longer enjoyment. Unfrosted cake layers freeze beautifully. To do so, ensure the cake layers are completely cooled. Then, wrap each layer tightly in plastic wrap, followed by a layer of aluminum foil. This double wrapping helps prevent freezer burn. You can freeze the layers for up to 2-3 months. When you’re ready to enjoy it, simply transfer the frozen layers to the refrigerator overnight to thaw. Once thawed, you can frost and serve as usual. This makes it a fantastic make-ahead dessert!
What’s the best way to store a sour cream cake?
Effective storing sour cream cake ensures its freshness and delightful texture.
- Unfrosted Cake: For unfrosted cake layers or a whole unfrosted cake, the best method is to store it in an airtight container at room temperature. This helps retain moisture and protects it from drying out. A cake dome or a large container with a tight-fitting lid works perfectly.
- Frosted Cake: If your sour cream cake is topped with a dairy-based frosting, like the classic cream cheese frosting, it must be stored in the refrigerator. The dairy in the frosting is perishable. Place the frosted cake in an airtight cake carrier or cover it loosely with plastic wrap to prevent it from absorbing refrigerator odors. Before serving, allow the refrigerated cake to come to room temperature for about 30-60 minutes; this will soften the frosting and enhance the cake’s flavors and texture.
By following these simple storage tips, you can extend the deliciousness of your homemade sour cream cake.
Conclusion: Savoring Your Homemade Sour Cream Cake
You’ve done it! You’ve transformed simple ingredients into a masterpiece of moistness and flavor – a truly classic sour cream cake. From the initial whisking to the final, triumphant slice, you’ve brought a piece of comforting nostalgia into your home. This isn’t just a dessert; it’s a testament to the joy of homemade goodness, a perfect centerpiece for family gatherings, or a quiet indulgence with a cup of coffee.
The journey of baking, from measuring each ingredient to witnessing the transformation in the oven, is a rewarding one. You’ve learned the scientific secrets behind sour cream’s magic, mastered the step-by-step process, and even discovered how to troubleshoot common baking challenges. Now, you hold the power to recreate that beloved taste whenever the craving strikes.
So, go ahead, cut yourself another slice. Savor the tender crumb, the rich taste, and the satisfaction of knowing you created something truly special. Enjoy every delicious, comforting bite!