Pineapple Cake Mix recipes
A Slice of Sunshine and Sweet Memories
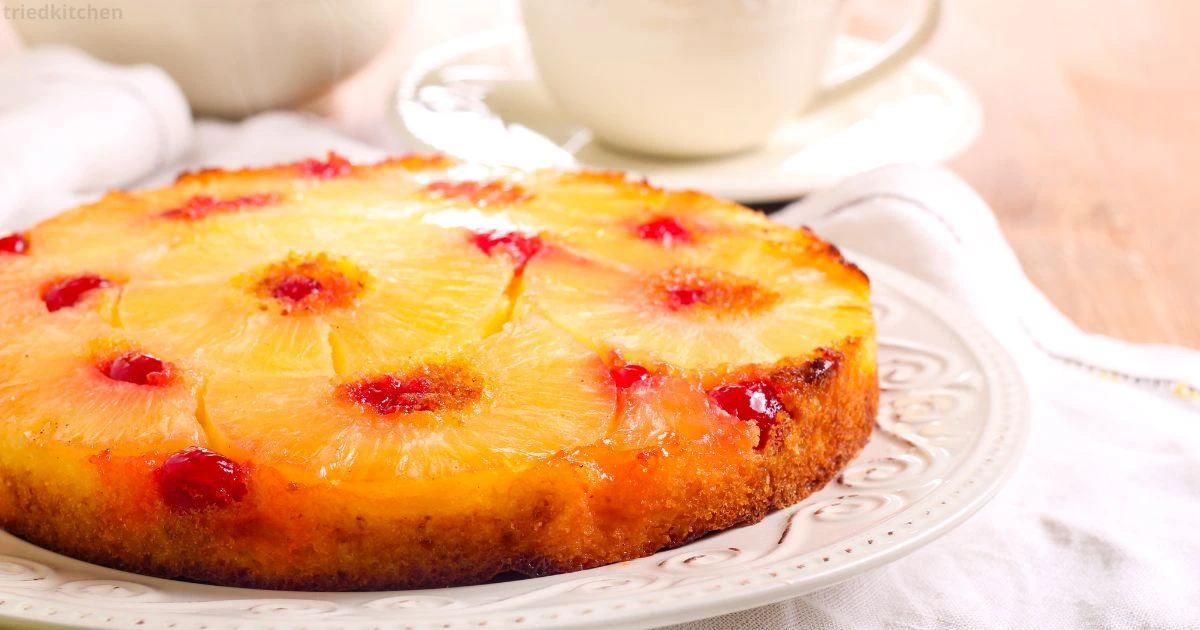
Can you recall those vibrant kitchen moments, the air filled with an almost tangible anticipation, as a perfectly golden-brown cake emerged from your oven? Its glistening, caramelized pineapple seemed to promise pure delight. For many of us, a pineapple upside down cake is far more than a mere dessert; it’s a direct gateway to treasured childhood memories, to vibrant family gatherings where laughter freely cascaded, and to the uncomplicated happiness found in a homemade treat.
Yet, let’s be entirely honest with ourselves: sometimes life accelerates, and the prospect of embarking on a baking project from the ground up can feel overwhelmingly challenging. But what if I told you that you could effortlessly recapture that very magic, that delectable flavor of pure nostalgia, with a modest assist from a simple cake mix? This comprehensive article is crafted specifically for you – for anyone who yearns for that classic, beloved dessert without the customary fuss. Whether you are a bustling parent, an enthusiastic novice baker, or simply someone seeking a burst of sunshine on a dreary afternoon, this guide is your key. Prepare yourself to transform a straightforward box of cake mix into a truly showstopping, impeccably moist, and utterly delightful pineapple upside down cake.
Gathering Your Sweet Arsenal: Essential Ingredients for Your Pineapple Upside Down Cake
To construct your flawless pineapple upside down cake, you’ll need to gather a select group of ingredients. While the cake mix itself simplifies much of the process, each additional component plays a crucial role in achieving that signature taste and texture.
The Cake Mix Marvel: Choosing the Right Foundation
When you embark on this baking adventure, your cake mix is your fundamental building block. The right choice here sets the stage for a delicious outcome.
- Key Points for Your Selection:
- Yellow cake mix is undeniably the traditional and often preferred choice for pineapple upside down cake. Its rich, buttery flavor perfectly complements the tropical notes of pineapple and the sweet caramel.
- However, don’t feel entirely restricted! You can certainly achieve wonderful results with vanilla or even a butter pecan cake mix if you’re looking to introduce a subtle twist to the classic profile.
- Consider specific brands known for their consistent performance. Many home bakers find success with popular choices like Betty Crocker Super Moist or Duncan Hines mixes, as they are formulated to deliver a tender crumb.
- The inherent brilliance of using a cake mix lies in its simplification of the entire baking process. You bypass the meticulous measuring of various flours, leavening agents, and sugars, allowing you to focus on the enjoyable aspects of assembly.
- A Word on Sizes:
- Most standard cake mixes come in a 15.25-ounce (approximately 432-gram) box, which typically yields a two-layer cake or a single 9×13-inch sheet cake. This size is usually perfect for a standard 9-inch round pineapple upside down cake. Always double-check the specific instructions on your chosen box, as slight variations can occur.
Pineapple Perfection: Canned vs. Fresh
The star of your show, the pineapple, is crucial. While fresh pineapple might seem appealing, the traditional and often most successful route involves canned varieties.
- Key Points for Your Pineapple:
- Canned pineapple rings are the quintessential choice for pineapple upside down cake. You’ll want to select those packed in juice, not heavy syrup. While some recipes might suggest syrup for extra caramelization, the juice provides ample moisture and flavor without making the final product overly sweet or sticky.
- Thoroughly draining your pineapple rings is a step you absolutely must not skip. Excess liquid can lead to a soggy cake base, preventing that lovely caramelization. Gently press them between layers of paper towels to absorb as much moisture as possible.
- For those adventurous souls who prefer a more hands-on approach, using fresh pineapple is certainly an option. If you opt for fresh, ensure you slice it uniformly and, again, pat it dry. However, be prepared for a slightly different texture and potentially less inherent moisture in the fruit itself, which might impact the overall “gooeyness” of your topping.
- Considering the Difference:
- Canned pineapple tends to be consistently sweet and tender, having undergone a processing that breaks down some of its fibers. Fresh pineapple, while offering a brighter, more acidic flavor, can sometimes be firmer or vary in sweetness. For ease and consistent results, especially when using a cake mix, canned rings in juice remain the top recommendation.
The Caramel Crown: Butter, Brown Sugar, and Cherries
This trio forms the glorious, sticky, sweet topping that makes pineapple upside down cake so iconic.
- Key Points for Your Topping:
- Unsalted butter is your best friend for this layer. It melts beautifully and combines with the brown sugar to create a rich, inviting caramel. Using unsalted butter allows you to control the overall saltiness of your cake.
- When it comes to brown sugar, you have a choice between light or dark brown sugar. Light brown sugar will yield a milder, sweeter caramel, while dark brown sugar will offer a deeper, more molasses-like flavor, which some bakers prefer for its complexity. Both work wonderfully, so choose what pleases your palate most.
- Maraschino cherries are the traditional, vibrant accents that dot your pineapple rings. They add a burst of color and a sweet, slightly tart counterpoint to the rich pineapple. Remember to drain these well too, as their liquid can also thin out your caramel.
Step-by-Step Sweet Success: Crafting Your Pineapple Upside Down Cake
Now that you have all your components ready, let’s assemble this delicious creation. Following these steps precisely will help you achieve a stunning outcome.
Prepping Your Pan for Perfection
The foundation of your cake, literally, begins with proper pan preparation. This critical step ensures your cake releases cleanly and beautifully.
- Key Points for Pan Preparation:
- Your primary goal is to create a non-stick surface that also forms the caramel base. Begin by greasing your pan generously. While traditional methods involve butter and flour, a good quality non-stick baking spray specifically designed for baking can also be effective.
- A 9-inch round baking pan is the standard size for this recipe, producing a cake with a good height and a perfectly sized top.
- The most effective method involves melting butter directly in the pan. This allows it to coat the bottom and sides evenly before you add the sugar and fruit.
- Introduction:
Remember those golden rays of nostalgia, the sunshine pouring into your kitchen, perfectly mirroring the joyful anticipation as that glorious pineapple upside-down cake emerged from the oven? For many of us, that tantalizing dessert isn’t merely a treat; it’s a direct passage to cherished memories—family gatherings filled with laughter, birthdays punctuated by cheer, and the undeniable delight of a homemade delicacy. But let’s be entirely candid: life can be incredibly demanding. The thought of baking from scratch, navigating complex recipes and myriad ingredients, can often feel overwhelmingly daunting.
What if, however, I revealed a secret? What if I told you that you could effortlessly recreate that very magic, that delicious taste of yesteryear, with an uncomplicated assist from a humble cake mix? This comprehensive guide is tailor-made for you – whether you’re a bustling parent juggling a million tasks, an enthusiastic yet novice baker eager to explore, or simply someone craving that quintessential taste of sunshine on a quiet afternoon. You are about to discover how to transform a straightforward box of cake mix into a breathtakingly beautiful, impeccably moist, and utterly delightful pineapple upside-down cake. Prepare to impress yourself and everyone around you!
The Foundation of Flavor: Selecting Your Cake Mix
To begin your journey toward pineapple upside-down cake perfection, your choice of cake mix forms the fundamental building block. Making an informed decision here is the first step toward a triumphant dessert that will captivate your taste buds.
Choosing Your Cake Mix: The Right Foundation
When you stand in the baking aisle, confronted by a kaleidoscope of cake mix options, you might wonder which one is truly optimal for your pineapple upside-down cake. While many can work, certain varieties are particularly suited to this classic.
- Your Go-To Choices:
- Yellow cake mix reigns supreme as the traditional and most frequently recommended option for pineapple upside-down cake. Its inherent buttery notes and rich vanilla undertones perfectly complement the sweet-tartness of pineapple and the deep caramelization. It provides a comforting, familiar taste that evokes classic baking.
- Don’t limit yourself strictly to yellow, though! Vanilla cake mix is another excellent contender, offering a clean, adaptable base that allows the pineapple and caramel flavors to truly shine. Some bakers even enjoy experimenting with butter pecan or golden butter mixes for an added layer of nutty richness or deeper buttery essence, which can introduce a delightful complexity to your finished creation.
- Consider brands that consistently deliver quality results. Many home bakers find immense success with widely recognized names like Betty Crocker Super Moist or Duncan Hines. These mixes are engineered to produce a tender, moist crumb, which is exactly what you desire in a perfect pineapple upside-down cake. Their reliability takes much of the guesswork out of the baking process.
- The true genius of employing a cake mix is the unparalleled simplicity it brings to your kitchen. You effectively bypass the meticulous, often time-consuming task of measuring and sifting individual dry ingredients like flours, leavening agents, and various sugars. This convenience frees you to concentrate on the more enjoyable, creative aspects of assembling and decorating your dessert. It democratizes baking, making it accessible to even the busiest schedules.
- Understanding Cake Mix Quantities:
- Most conventional cake mixes are packaged in standard sizes, typically around 15.25 ounces (approximately 432 grams). This size is generally ideal for preparing a single 9-inch round cake, which is the most common form for pineapple upside-down cake. It’s always a prudent practice to glance at the specific instructions on your chosen cake mix box, as minor variations in weight and recommended liquid amounts can exist between brands. Paying attention to these details ensures you have the correct volume of batter for your pan.
The Star of the Show: Selecting Your Pineapple
The pineapple, obviously, is the undeniable centerpiece of your upside-down cake. While the allure of fresh, vibrant fruit is strong, for this particular dessert, the convenience and consistent moisture profile of canned pineapple often yield the most successful and aesthetically pleasing results.
Pineapple Perfection: Canned vs. Fresh
Deciding on your pineapple format is a pivotal step. For the authentic, gooey, caramelized topping, canned pineapple usually takes the crown.
- Why Canned is Often Best:
- Canned pineapple rings are not merely a traditional choice; they are the gold standard for this cake. When selecting your canned pineapple, prioritize options packed in 100% juice, not heavy syrup. While a syrup-packed variety might seem to promise extra sweetness or caramelization, it can often lead to an excessively sugary or overly wet topping, potentially making your cake soggy. The natural juice provides ample moisture and flavor without tipping the balance.
- A crucial, non-negotiable step is to thoroughly drain your pineapple rings. This cannot be overstressed. Any surplus liquid clinging to the fruit will compromise the caramel layer, preventing it from properly setting and leading to a soggy, undesirable cake base. To achieve optimal dryness, gently press the pineapple slices between several layers of paper towels, absorbing as much moisture as possible. This ensures your caramel remains perfectly gooey, not watery.
- The Case for Fresh (with Caveats):
- For those dedicated to a truly hands-on, from-scratch experience, utilizing fresh pineapple is an option. If you venture down this path, ensure you slice the fruit uniformly to about 1/4 to 1/2 inch thickness. Again, pat the fresh slices thoroughly dry to remove excess moisture.
- However, be mindful that fresh pineapple often carries a higher water content and a slightly different fibrous texture compared to its canned counterpart. This can subtly alter the final consistency of your caramel layer and the overall “gooeyness” that is so characteristic of a classic pineapple upside-down cake. It might also require a bit more sugar in the caramel to achieve the desired sweetness.
- Understanding Moisture and Sweetness:
- Canned pineapple undergoes a gentle cooking process during canning, which breaks down its fibers, resulting in a consistently tender and sweet fruit. This pre-softening contributes significantly to the signature moistness of the topping. Fresh pineapple, while offering a brighter, more assertive acidity, can sometimes be firmer or vary unpredictably in its sweetness. For ease, reliability, and that quintessential caramelized texture, canned rings in juice remain the most highly recommended option for your pineapple upside-down cake using cake mix.
The Irresistible Crown: Butter, Brown Sugar, and Cherries
This triumvirate of ingredients—butter, brown sugar, and maraschino cherries—forms the visually stunning and utterly delicious caramelized topping that distinguishes your pineapple upside-down cake. This layer is where much of the magic happens, transforming simple components into a shimmering, sweet glaze.
- Crafting Your Topping:
- Unsalted butter is your essential ally for creating this rich, luscious layer. When melted, it seamlessly integrates with the brown sugar, creating that deep, inviting caramel. Opting for unsalted butter grants you meticulous control over the overall sodium content and flavor balance of your cake.
- Regarding brown sugar, you possess a delightful choice between light brown sugar and dark brown sugar. Light brown sugar will produce a caramel that is subtly sweet and delicate in flavor, allowing the pineapple to truly shine. Conversely, dark brown sugar, with its higher molasses content, will yield a richer, more profound, almost treacle-like caramel, favored by those who appreciate a deeper, more complex sweetness. Both varieties perform admirably, so your decision can be guided purely by your personal preference for sweetness and depth of flavor.
- Maraschino cherries are the traditional, vivacious jewels that punctuate your pineapple rings, adding both a burst of vibrant color and a delightful sweet-tart counterpoint to the cake’s richness. Remember to drain these thoroughly as well; any excess liquid from the cherries can dilute your meticulously crafted caramel layer.
The Art of Assembly: Step-by-Step Sweet Success
With your ingredients meticulously chosen and prepared, you are now poised to begin the actual construction of your delectable pineapple upside-down cake. Adhering closely to these sequential steps will not only ensure a seamless baking process but also guarantee a visually stunning and exquisitely flavored outcome.
Prepping Your Pan for Perfection
The proper preparation of your baking pan is an absolutely critical, foundational step. This initial stage directly impacts the clean release of your cake and the flawless presentation of its signature caramelized top.
Table 1: Pan Preparation Basics
| Step | Description | Notes |
| 1. Melt Butter | Melt 1/4 cup (or 4 tablespoons) of unsalted butter directly in your 9-inch round baking pan (or in a separate bowl and pour in). | Ensure the butter coats the entire bottom surface and slightly up the sides of the pan. |
| 2. Add Brown Sugar | Evenly sprinkle 1 cup of packed brown sugar (light or dark, as preferred) over the melted butter. | This combination will melt during baking to form your delicious caramel layer. |
| 3. Arrange Pineapple | Place 8-9 well-drained pineapple rings (from a 20 oz can) over the brown sugar layer. | Arrange them in a single layer. You can overlap slightly if needed, but try to keep a generally flat surface. |
| 4. Place Cherries | Place one well-drained maraschino cherry in the center of each pineapple ring, and scatter any remaining cherries in between. | These add a beautiful burst of color and a touch of extra sweetness. |
Mastering the Mix: Preparing Your Cake Batter
Now, let’s turn our attention to the cake batter itself. The beauty of using a cake mix is the built-in simplicity, but a few small considerations can elevate your results.
- Key Points for Batter Preparation:
- The most crucial instruction here is to meticulously follow the directions provided on your specific cake mix box. These instructions are calibrated to achieve the optimal consistency and leavening for that particular mix, including precise measurements for liquid (water, milk, or juice) and egg additions. Resist the urge to deviate significantly from these guidelines for the primary liquid, unless you are deliberately incorporating one of our “moisture matters” hacks, which we’ll discuss shortly.
- Avoid overmixing your batter at all costs. Overmixing develops the gluten in the flour, which can lead to a tough, dense, or rubbery cake texture. Mix only until the dry ingredients are just incorporated with the wet, and the batter appears mostly smooth. A few small lumps are perfectly acceptable and will typically dissolve during the baking process, resulting in a tender crumb.
- Once your batter is perfectly prepared, gently and evenly pour it over the pineapple and caramel layer in your prepared pan. Take care not to disturb the meticulously arranged fruit and sugar beneath. You can use an offset spatula to gently spread the batter to the edges of the pan, ensuring even coverage.
Baking Bliss: Achieving Golden Perfection
The final stage of preparation before you enjoy your cake is the baking process itself. Precision here ensures a beautifully cooked, moist cake.
- Key Points for Baking:
- Always preheat your oven thoroughly to the temperature specified on your cake mix box. An accurately preheated oven is essential for proper cake rise and even baking. Placing your cake in a cold or insufficiently heated oven can lead to an uneven texture and poor rise.
- Pay close attention to the baking time guidelines provided on your cake mix packaging. These are good starting points. However, ovens can vary, so the best indicator of doneness is always the toothpick test. Insert a clean wooden toothpick into the center of the cake; if it emerges clean or with only a few moist crumbs clinging to it, your cake is done. If it has wet batter, continue baking for a few more minutes and test again.
- Resist the temptation to open the oven door too frequently during baking. Each time you open the door, the oven temperature drops, which can disrupt the cake’s delicate rising process, potentially leading to a sunken center or an uneven texture. Peek only when absolutely necessary, especially towards the end of the baking time.
- Typical baking times for a standard 9-inch round cake made from a mix usually range from 30 to 40 minutes, but again, your oven and pan material can influence this.
Elevating Your Cake Mix Creation: Tips for Perfect Results
While a cake mix provides undeniable convenience, you possess the power to transform it into something truly extraordinary. These “hacks” focus on boosting moisture, enhancing flavor, and ensuring a flawless presentation of your pineapple upside-down cake.
Moisture Matters: Keeping Your Cake Tender
A dry cake is a sad cake. These simple swaps will ensure your pineapple upside down cake is wonderfully moist and tender, surpassing typical box mix expectations.
- Key Points for Enhanced Moisture:
- Swap water for milk or buttermilk: Instead of using the water called for on your cake mix box, substitute an equal amount of whole milk or buttermilk. Whole milk introduces extra fat and richness, contributing to a moister crumb. Buttermilk, with its acidity, interacts with the leavening agents in the mix, resulting in an incredibly tender texture and a subtly tangy flavor that complements the pineapple beautifully.
- Add an extra egg or egg yolk: Most cake mixes call for 2 or 3 eggs. Consider adding one extra large egg, or even just an extra egg yolk, to the batter. Eggs contribute fat and protein, both of which are crucial for a moist and tender cake structure. An extra yolk specifically boosts richness and color.
- Incorporate sour cream or Greek yogurt: Stirring in 1/4 to 1/2 cup of full-fat sour cream or plain Greek yogurt to your batter can dramatically increase moisture and add a delightful tanginess. The fat content in these dairy products is a secret weapon for tenderness.
- Use the reserved pineapple juice: Instead of discarding the juice from your canned pineapple, use it as part or all of the liquid called for in your cake mix. This infuses even more natural pineapple flavor directly into the cake itself, enhancing the overall tropical profile.
Flavor Boosts: Beyond the Box
While the cake mix provides a good base, a few strategic additions can make your pineapple upside down cake taste genuinely homemade and incredibly flavorful.
- Key Points for Flavor Enhancement:
- Vanilla or almond extract: Even if your cake mix is vanilla-flavored, adding an extra teaspoon of good quality vanilla extract (or a half teaspoon of almond extract for a subtle, sophisticated note) can deepen the overall flavor profile. These extracts bring warmth and complexity.
- A pinch of spice: A tiny pinch (about 1/4 teaspoon) of ground nutmeg or cinnamon, stirred into the dry cake mix before adding liquids, can add a comforting warmth and aromatic depth that beautifully complements the pineapple and caramel.
- Brown sugar in the batter: For an even richer, deeper flavor throughout the cake, consider replacing a tablespoon or two of the granulated sugar called for on the box (if any) with brown sugar. This small swap will subtly enhance the molasses notes.
The Big Flip: Tips for a Flawless Reveal
The moment of truth! Inverting your pineapple upside down cake can feel nerve-wracking, but with the right technique, you’ll achieve a perfect, intact topping every time.
- Key Points for a Smooth Inversion:
- Patience is a virtue (but not too much!): Allow your cake to cool in the pan for precisely 5 to 10 minutes after removing it from the oven. This brief cooling period is crucial. It allows the hot caramel to slightly firm up and adhere to the cake, while still being warm enough to release from the pan easily. If you wait too long, the caramel can harden and stick stubbornly to the bottom. If you flip too soon, the caramel might still be too liquid and run off.
- Prepare your serving plate: Select a sturdy serving plate or platter that is larger than your cake pan. You’ll be flipping the cake directly onto this.
- The confident flip: Place your serving plate upside down over the cake pan. With oven mitts protecting your hands, grasp the pan and the plate firmly together. In one swift, confident motion, invert the cake pan onto the serving plate. Resist the urge to hesitate.
- Gently lift: Let the pan rest on the plate for a minute or two. Then, very gently lift the cake pan straight up. Your beautiful pineapple and caramel topping should now be perfectly positioned on top of your cake!
- Dealing with stragglers: In the rare event that a piece of pineapple or a cherry decides to cling to the pan, don’t despair! While the cake is still warm, carefully use a small offset spatula or butter knife to gently lift the rogue piece and reattach it to its rightful place on the cake. The warm caramel will help it adhere.
Serving Suggestions and Storage: Enjoying Your Masterpiece
Once your pineapple upside down cake has cooled and been admired, it’s time to enjoy the fruits of your labor! Knowing how to present and preserve your cake will enhance the experience.
Presentation Perfection: Garnishes and Accompaniments
A beautifully baked cake deserves a thoughtful presentation. These simple additions can elevate your pineapple upside down cake from delicious to truly memorable.
- Key Points for Presentation:
- Serve warm for ultimate indulgence: Pineapple upside down cake is at its absolute best when served slightly warm. The caramel is gooey, and the cake remains wonderfully tender.
- Classic pairings: A generous scoop of premium vanilla bean ice cream melting gently over a warm slice is a timeless and incredibly satisfying combination. Alternatively, a dollop of freshly whipped cream provides a lighter, airy contrast to the rich cake.
- Textural and aromatic accents: For an extra layer of flavor and texture, consider sprinkling a light dusting of toasted coconut flakes over the top. The subtle nuttiness of toasted coconut harmonizes beautifully with pineapple. A scattering of finely chopped pecans or walnuts can also add a delightful crunch.
- Simple elegance: Sometimes, less is more. A simple dusting of powdered sugar over the cake can provide a delicate, elegant finish without overpowering the natural beauty of the pineapple topping.
Storing Your Sweet Treat
To ensure your pineapple upside down cake remains fresh and delicious for as long as possible, proper storage is key.
- Key Points for Storage:
- Room temperature for short-term: Once your cake has completely cooled, store it in an airtight container at room temperature. It will remain fresh and moist for approximately 2 to 3 days. The airtight seal is crucial to prevent the cake from drying out.
- Refrigeration for extended freshness: If you need to store the cake for a longer period, you can place it in an airtight container in the refrigerator. It will typically last for up to 5 days when refrigerated. Be aware, however, that refrigeration can sometimes cause the cake to dry out slightly or the caramel to firm up more. To counteract this, allow slices to come to room temperature or gently warm them before serving.
- Freezing for long-term enjoyment: For prolonged storage, freezing is an excellent option. Ensure the cake is completely cool. You can freeze individual slices, wrapped tightly in plastic wrap and then aluminum foil, or freeze the entire cake (without any perishable toppings like whipped cream) using the same method. Frozen pineapple upside down cake can last for 2 to 3 months. Thaw it overnight in the refrigerator before serving, or gently warm individual slices.
- Avoid exposure to air: No matter the storage method, minimizing exposure to air is the most important factor in maintaining your cake’s freshness and moisture.
FAQs About Pineapple Upside Down Cake Using Cake Mix
You’ve got questions, and we’ve got answers! Here are some common inquiries about creating a perfect pineapple upside-down cake using a convenient cake mix.
- Q: Can I make pineapple upside down cake using a gluten-free cake mix?
- A: Absolutely, yes! Most gluten-free cake mixes are formulated to perform similarly to traditional mixes. You can follow the package instructions for your gluten-free mix, incorporating our tips for enhancing moisture (like using milk or an extra egg) to ensure a tender and delicious outcome.
- Q: What kind of pan is best for pineapple upside down cake using cake mix?
- A: A 9-inch round baking pan is the most commonly recommended and effective choice for a beautifully proportioned cake. However, you can also use a cast-iron skillet (ensure it’s well-seasoned to prevent sticking) for a charming, rustic presentation. Some bakers even use a 9×13-inch rectangular pan if serving a larger crowd, simply adjusting the pineapple and cherry arrangement to cover the larger surface.
- Q: My pineapple upside down cake using cake mix stuck to the pan! What went wrong?
- A: This is a common frustration, but it’s usually preventable. The most frequent culprits are insufficient greasing and sugaring of the pan, or waiting too long to flip the cake. You must ensure you generously butter the bottom and sides of your pan and evenly sprinkle the brown sugar. The cake needs to be inverted while still warm (5-10 minutes out of the oven) so the caramel hasn’t completely solidified and adhered to the pan. If it does stick, sometimes placing the pan back over low heat for a minute or two can help re-liquefy the caramel for an easier release.
- Q: Can I use fresh pineapple instead of canned for my pineapple upside down cake using cake mix?
- A: While canned pineapple in juice is highly recommended for its consistent moisture and tenderness, you can use fresh pineapple. If you choose fresh, ensure it’s sliced uniformly (about 1/4 to 1/2 inch thick) and, crucially, pat it very dry to remove excess moisture. Be aware that fresh pineapple might offer a slightly different texture and less inherent sweetness, potentially requiring a bit more brown sugar in the caramel layer.
- Q: How do I know when my pineapple upside down cake using cake mix is done baking?
- A: The most reliable method is the toothpick test. Insert a clean wooden toothpick into the very center of the cake. If it comes out clean, or with only a few moist crumbs clinging to it, your cake is perfectly baked. If you see wet batter, continue baking in 3-5 minute increments and re-test until clean. The cake should also appear golden brown around the edges and spring back lightly when gently pressed.
Conclusion: Sweet Endings, Effortless Beginnings
There’s an undeniable satisfaction in taking a straightforward box of cake mix and, with just a few mindful adjustments, transforming it into a dessert that not only appears to be the product of hours of painstaking labor but tastes even better. This pineapple upside-down cake, crafted with remarkable ease and infused with genuine warmth, serves as a powerful testament to the fact that creating something truly delicious absolutely does not have to be a complicated endeavor.
So, what are you waiting for? Embrace the simplicity and joy! Go ahead, embark on this delightful baking journey, whip up a batch of this golden sunshine, and allow your home to be filled with the intoxicating aroma of caramelized pineapple. As you share each perfectly moist, radiantly bright slice, you won’t just be serving a dessert; you’ll be creating new, sweet memories, one delectable bite at a time. Enjoy the effortless magic that unfolds in your very own kitchen!

