
Easy Monster Cookie Recipe with Oats and M&Ms
It’s a familiar scene, isn’t it? The air thick with the aroma of something baking, the gentle hum of your oven, and the impatient tapping of feet (big or small) waiting for that first bite of pure, unadulterated cookie bliss. For many, the magic of baking has always been about more than just the ingredients; it’s about the memories created, the shared smiles, and the comforting feeling of home. And when it comes to cookies that deliver on all fronts, the monster cookie holds a special place. These aren’t just any cookies; they’re an adventure in every bite, packed with all the good stuff – the chewiness of oats, the satisfying crunch of M&Ms, and that unmistakable homemade taste. Get ready to create some delicious memories of your own with this unbelievably easy monster cookie recipe. You’re about to discover why these colossal confections earn their legendary name.
What Makes a Monster Cookie “Monster”?
You might be wondering, what exactly elevates a humble cookie to “monster” status? The answer lies in its grand ambition and generous assortment of components. The concept of the monster cookie first emerged in the mid-20th century, a delightful amalgamation of several beloved cookie elements. Imagine taking the best parts of a chocolate chip cookie, a peanut butter cookie, and an oatmeal cookie, then combining them into one glorious, oversized treat. That, in essence, is the birth of the monster cookie.
The “monster” moniker itself refers to a few key attributes. Primarily, it speaks to the sheer variety of ingredients packed into each bite. You’ll often find a medley of chocolate chips, peanut butter, oats, and colorful candies (like M&Ms) coexisting harmoniously. Secondly, these cookies are frequently larger than your average drop cookie, living up to their imposing name. This grand scale means more surface area for all those delightful textures and flavors to shine through.
The enduring appeal of the monster cookie is clear: it offers something for virtually everyone. If you’re a fan of rich chocolate, you’ll find it here. If you crave the creamy taste of peanut butter, it’s there. And if you appreciate the wholesome chewiness of oats, you’re in luck. This blend of classic cookie profiles makes them incredibly satisfying and a guaranteed crowd-pleaser. Understanding the history and composition of what are monster cookies helps you appreciate the culinary marvel you’re about to create.
Why This Easy Monster Cookie Recipe Will Be Your New Favorite
You’re likely on the hunt for a recipe that delivers on flavor without demanding hours of your precious time. And that’s precisely where this easy monster cookie recipe shines. We’ve meticulously crafted these instructions to ensure a seamless baking experience, making it a perfect choice for both novice bakers and seasoned pros with packed schedules.
One of the standout features of this particular method is its remarkable simplicity. Forget about multiple bowls for mixing dry and wet ingredients separately; many steps can be accomplished right in one mixing bowl, streamlining your cleanup. Another common hurdle in cookie baking, dough chilling, is minimized or even eliminated, meaning you can go from craving to cookie much faster than with traditional recipes. This makes it an ideal option for those spontaneous baking urges or when you need a batch of delicious treats in a pinch. You’ll quickly discover why this is considered a quick monster cookie solution.
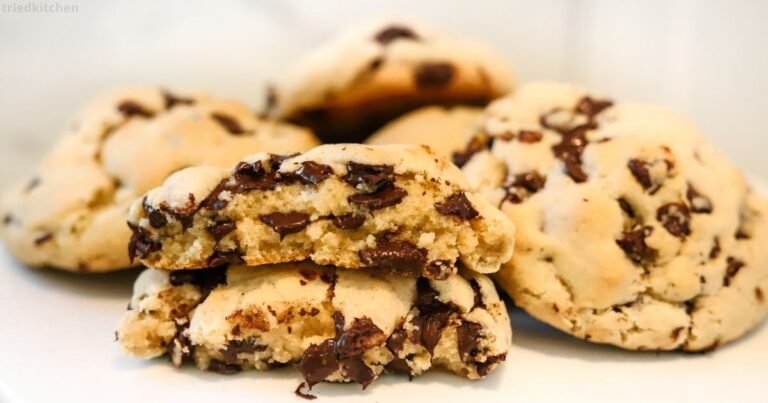
Beyond its ease, the results speak for themselves. You’ll achieve that coveted monster cookie texture: a delightful balance of slightly crispy edges that give way to a wonderfully soft and chewy center. Every bite is an experience, a symphony of textures and tastes that will have you reaching for another. This balance is what sets apart the best monster cookie recipe from merely good ones.
Furthermore, this recipe offers fantastic versatility. While we focus on the classic oats and M&M combination, the foundation is robust enough to welcome your own creative additions. Think about different types of chocolate, various nuts, or even other candies to customize your batch. This adaptability ensures that your monster cookies can evolve to suit your personal preferences, making them truly your own. Get ready to embrace a baking process that’s as enjoyable as the cookies themselves.
Gather Your Ghoulish Goodies: Monster Cookie Ingredients
Before you dive into the delightful process of baking, it’s essential to have all your “ghoulish goodies” at the ready. The success of your monster cookie with oats and M&Ms hinges on having the correct ingredients, measured accurately. Here’s a comprehensive list to guide you, presented in a clear format to ensure you don’t miss a thing. You’ll notice that many of these are standard pantry staples, making these cookies even more accessible.
| Ingredient | Quantity | Notes |
| Unsalted Butter | 1 cup (2 sticks) | Ensure it’s softened to room temperature for proper creaming. |
| Granulated Sugar | 1 cup | |
| Packed Light Brown Sugar | 1 cup | Adds moisture and a richer, caramel-like flavor. |
| Creamy Peanut Butter | 1 cup | Choose a good quality, stir-able brand for the best consistency. |
| Large Eggs | 2 | Room temperature eggs incorporate better into the batter. |
| Vanilla Extract | 1 tsp | Use pure vanilla extract for the most authentic flavor profile. |
| All-Purpose Flour | 2 cups | Use the “spoon and level” method for accurate measurement. |
| Baking Soda | 1 tsp | This leavening agent helps the cookies rise and spread correctly. |
| Salt | 1/2 tsp | Crucial for balancing the sweetness and enhancing other flavors. |
| Rolled Oats | 3 cups | Old-fashioned rolled oats are recommended for the best chewiness. |
| Chocolate Chips | 1 cup | Semi-sweet or milk chocolate work wonderfully, based on your preference. |
| M&M’s | 1 cup | Classic M&M’s provide that iconic crunch and burst of color. |
You might wonder about the role of each component in your M&M monster cookie. The butter and sugars form the rich, sweet base, providing tenderness and flavor. The peanut butter adds a unique nutty depth and contributes significantly to the characteristic texture. Eggs bind everything together and add richness. Vanilla extract, while seemingly small in quantity, plays a vital role in enhancing the overall aroma and taste.
The dry ingredients – flour, baking soda, and salt – are the structural backbone. The flour provides the framework, while baking soda ensures your cookies achieve that desirable lift and slight spread. Salt, often overlooked, is critical for balancing the intense sweetness from the sugars and candies, preventing the cookies from tasting cloyingly sweet. Finally, the stars of the show, the rolled oats, chocolate chips, and M&Ms, provide the signature chewiness, melty chocolate pockets, and vibrant pops of color and crunch that define a true monster cookie. Having these monster cookie ingredients precisely measured and ready will set you up for absolute success.
The Recipe: How to Bake the Best Monster Cookies
Now, for the main event! Follow these precise monster cookie recipe steps to create a batch of incredibly satisfying and perfectly textured monster cookies. You’ll find that the process is straightforward, designed to be enjoyable from start to finish.
H3. Prep Work: Setting the Stage for Sweet Success
Before you even touch your mixing bowl, a little preparation goes a long way in ensuring a smooth baking experience.
- Preheat Your Oven: You’ll want your oven at the correct temperature from the moment your cookies go in. Set your oven to 350°F (175°C). This ensures even baking and proper rising.
- Prepare Your Baking Sheets: Line two large baking sheets with parchment paper or silicone baking mats. This prevents sticking and makes for easy cleanup. It also helps your cookies bake evenly without scorching the bottoms.
- Gather All Ingredients: This might seem basic, but having all your measured ingredients ready before you begin mixing saves time and reduces the chance of errors. Ensure your butter and eggs are at room temperature, as this helps them incorporate smoothly into the batter, leading to a more consistent dough.
H3. Mixing Your Monster Masterpiece
This is where the magic begins. Follow these steps for combining your ingredients to create that perfect monster cookie dough.
- Cream the Fats and Sugars: In a large mixing bowl (or the bowl of a stand mixer fitted with the paddle attachment), cream together the softened unsalted butter, granulated sugar, and packed light brown sugar. Beat on medium speed until the mixture is light, fluffy, and pale in color. This process typically takes about 2-3 minutes. You’re incorporating air here, which contributes to the cookies’ texture.
- Incorporate Peanut Butter: Add the creamy peanut butter to the butter and sugar mixture. Continue beating until it is thoroughly combined and smooth, scraping down the sides of the bowl as needed.
- Add Eggs and Vanilla: Beat in the large eggs, one at a time, mixing well after each addition. This ensures each egg is fully incorporated into the batter. Once both eggs are in, stir in the vanilla extract. The mixture may look slightly curdled at this point, but don’t worry, it will come together with the dry ingredients.
- Combine Dry Ingredients: In a separate medium-sized bowl, whisk together the all-purpose flour, baking soda, and salt. Whisking ensures these ingredients are evenly distributed, so you don’t end up with pockets of unmixed leavening agents or salt.
- Gradually Add Dry to Wet: With the mixer on low speed, gradually add the dry ingredient mixture to the wet ingredients. Mix only until just combined. Overmixing at this stage can develop the gluten in the flour too much, leading to tough cookies. As soon as you no longer see streaks of dry flour, stop mixing.
- Stir in the Mix-ins: Finally, gently fold in the rolled oats, chocolate chips, and M&Ms by hand using a sturdy spatula or wooden spoon. Mix until they are evenly distributed throughout the dough. You want to ensure every cookie gets a generous share of these delightful additions. This is the ultimate stage in how to make monster cookies truly monstrous!
H3. Baking Your Beautiful Beasts
The moment of truth! Get ready to watch your dough transform into delicious, golden-brown M&M monster cookies.
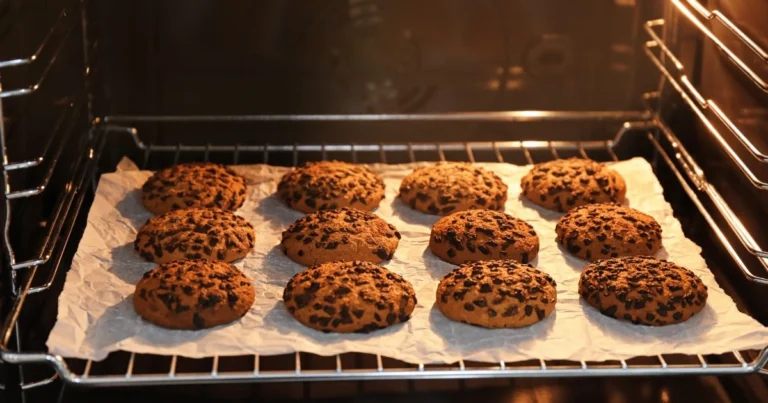
- Scoop the Dough: Using a 2-ounce cookie scoop (approximately 1/4 cup) or two tablespoons, drop rounded mounds of dough onto your prepared baking sheets. For truly “monster-sized” cookies, you can make them even larger, but adjust baking time accordingly. Ensure you leave enough space between each cookie – about 2-3 inches – as they will spread during baking.
- Bake to Perfection: Place one baking sheet at a time into your preheated oven. Bake for approximately 10-14 minutes. The exact time will depend on your oven and the size of your cookies. You’ll know they are done when the edges are set and lightly golden brown, but the centers still look slightly soft and puffy. This slight underbaking ensures a wonderfully chewy interior.
- Cooling Protocol: Once baked, remove the baking sheets from the oven. Let the cookies cool on the baking sheet for 5-10 minutes. This allows them to set up properly and prevents them from breaking apart when you move them. After this initial cooling, carefully transfer the cookies to a wire rack to cool completely. Cooling on a rack allows air to circulate around them, preventing a soggy bottom.
Following these precise steps will help you bake monster cookies that are consistently perfect, ready to be devoured.
Tips and Tricks for Perfect Monster Cookies Every Time
You’ve got the recipe, but a few insider tips can elevate your monster cookie tips from great to absolutely exceptional. These insights will help you troubleshoot common baking dilemmas and ensure every batch is a resounding success.
- Don’t Overmix the Dough: This is a golden rule for most cookies, and monster cookies are no exception. Once you add the flour, mix only until the ingredients are just combined. Overmixing develops the gluten in the flour, which can lead to tough, dense cookies instead of the soft, chewy texture you’re aiming for.
- Properly Measure Flour (Spoon and Level Method): Accuracy in measuring flour is crucial. Don’t scoop flour directly from the bag with your measuring cup, as this can compact it and lead to using too much. Instead, fluff the flour in its container with a spoon, then gently spoon it into your measuring cup. Level off the top with the straight edge of a knife. This “spoon and level” method ensures you have the correct amount of flour, preventing dry, crumbly cookies or ones that spread too much.
- Use Softened Butter, Not Melted: The recipe calls for softened butter for a reason. Creaming softened butter with sugar creates air pockets, which contribute to the cookies’ light and chewy texture. Melted butter will result in a denser, greasier cookie that spreads more. If your butter isn’t soft enough, you can cut it into smaller pieces and let it sit at room temperature for 15-20 minutes, or gently microwave it for a few seconds (be careful not to melt it!).
- Chilling the Dough (Optional but Recommended for Less Spread): While this recipe is designed to be relatively no-chill, if you find your cookies are spreading more than you’d like, a brief chill can work wonders. Cover the dough and refrigerate it for 30 minutes to an hour. This solidifies the fats, helping the cookies hold their shape better during baking. This is a fantastic perfect monster cookies strategy.
- Storage Tips:
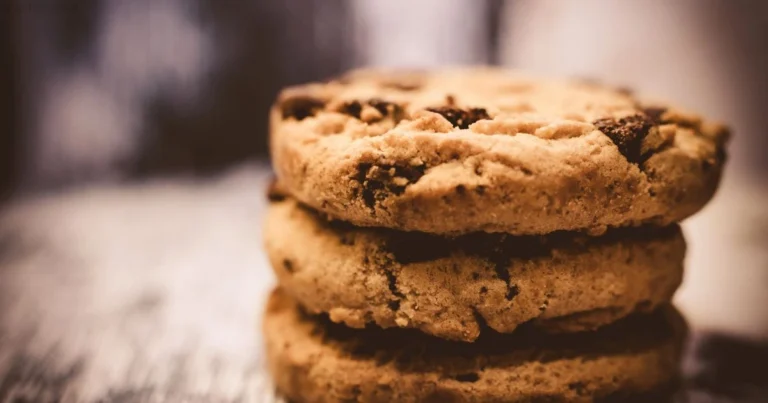
- Baked Cookies: Store cooled monster cookies in an airtight container at room temperature for up to 3-5 days. They remain wonderfully chewy and delicious.
- Dough: You can prepare the dough in advance! Wrap the dough tightly in plastic wrap and store it in the refrigerator for up to 3 days. When ready to bake, let it sit at room temperature for about 15-20 minutes to soften slightly before scooping.
- Freezing Dough: For longer storage, you can scoop the cookie dough balls onto a baking sheet and freeze them until solid (about 1-2 hours). Then, transfer the frozen dough balls to a freezer-safe bag or container and store for up to 3 months. When ready to bake, simply place the frozen dough balls on a baking sheet and add a few extra minutes to the baking time.
- Variations and Substitutions: Don’t be afraid to get creative with your monster cookie variations!
- Chocolate: Experiment with dark chocolate chips, white chocolate chips, or even chopped chocolate bars.
- Nuts: Add chopped peanuts, walnuts, or pecans for extra crunch and flavor.
- Other Candies: Instead of or in addition to M&Ms, try Reese’s Pieces, chopped candy bars, or even sprinkles for a festive touch.
- Nut-Free: If you need a nut-free version, substitute the peanut butter with a seed butter like sunflower seed butter (SunButter). Be aware that the flavor and texture will be slightly different, but still delicious!
By implementing these tips, you’ll consistently bake monster cookies that are not only delicious but also boast that ideal texture and appearance.
Frequently Asked Questions About Monster Cookies
You’ve got questions about these colossal cookies, and we’ve got answers. Here’s a rundown of common queries to ensure your monster cookie FAQ is fully addressed.
Q1: Can I make these monster cookies without peanut butter?
While peanut butter is a hallmark of the traditional monster cookie and contributes significantly to its unique flavor and texture, you can certainly experiment with alternatives. For a nut-free version, you can substitute the peanut butter with a good quality seed butter, such as sunflower seed butter (SunButter). Be aware that the flavor profile will shift, and the texture might be slightly different – often a bit drier – as peanut butter adds a lot of moisture and richness. If you choose to omit it entirely, you’d likely need to adjust other liquid ingredients (like adding a bit more butter or an extra egg yolk) to compensate for the lost fat and moisture, though this can significantly alter the cookie’s nature.
Q2: How do I store monster cookies to keep them fresh?
To maintain the optimal freshness and chewiness of your baked monster cookies, store them in an airtight container at room temperature. They will remain wonderfully soft and delicious for up to 3-5 days. If you want to extend their life, you can freeze baked cookies for up to 3 months. Simply place them in a single layer on a baking sheet to freeze solid, then transfer them to a freezer-safe bag or container, separating layers with parchment paper if stacking. Thaw them at room temperature or gently warm them in the microwave for a fresh-baked feel.
Q3: Can I add other mix-ins to this monster cookie recipe?
Absolutely! One of the joys of baking monster cookies is their incredible adaptability. This recipe provides a fantastic base for your creativity. Feel free to incorporate other delightful additions such as:
- Chopped nuts: Walnuts, pecans, or even roasted almonds.
- Shredded coconut: Adds a tropical chewiness.
- Different chocolate varieties: White chocolate chips, dark chocolate chunks, or even chopped candy bars.
- Other candies: Reese’s Pieces, chopped caramels, or even sprinkles for a festive touch.
Just be mindful of the total volume of your mix-ins. While the dough is robust, adding excessive amounts can make it difficult to form cookies or cause them to fall apart. Aim for roughly the same total volume as the combined chocolate chips and M&Ms (about 2 cups total).
Q4: My monster cookies spread too much. What went wrong?
Cookie spreading can be a common frustration, but several factors might be at play. If your monster cookies spread excessively, consider these possibilities:
- Butter Temperature: Your butter might have been too soft or even melted. Butter that’s too warm will cause cookies to flatten significantly. Ensure it’s just softened, not greasy.
- Oven Temperature: An inaccurate oven temperature can also cause spreading. If your oven is running too cool, the cookies will spread before they set. Consider investing in an oven thermometer to verify accuracy.
- Flour Measurement: Too little flour can lead to over-spreading. Always use the “spoon and level” method when measuring flour to ensure accuracy.
- Too Much Leavening: While this recipe balances leavening agents, too much baking soda can sometimes contribute to excessive spreading.
- Dough Temperature: If your kitchen is very warm, or if the dough has been sitting out for a while, it might be too warm. Chilling the dough for at least 30 minutes before baking can often help prevent excessive spreading, as it allows the fats to solidify.
- Greased Baking Sheets: While parchment paper or silicone mats are recommended, if you’re using an unlined sheet that’s too heavily greased, it can also contribute to spreading.
By addressing these common issues, you can troubleshoot monster cookies and achieve that perfect shape and texture.
Conclusion: Share Your Monster Masterpiece!
You’ve embarked on a delightful baking journey, and now you stand at the precipice of pure cookie bliss. This easy monster cookie recipe has provided you with the tools and techniques to create not just a batch of cookies, but a collection of moments – moments of anticipation, moments of shared joy, and moments of simple, satisfying indulgence.
These aren’t just any treats; they are a celebration of abundance, a testament to the fact that sometimes, more is indeed merrier. The satisfying chew of the oats, the rich pockets of chocolate, and the delightful crunch of the M&Ms come together in a symphony of flavors and textures that truly earns the “monster” moniker. You now possess the knowledge to consistently bake perfect monster cookies, whether for a casual afternoon snack, a special gathering, or just because you deserve a little something sweet.
So, go ahead! Let your kitchen fill with that irresistible aroma. Watch as these beautiful beasts emerge from your oven, golden and inviting. And most importantly, share your monster masterpiece. There’s an unparalleled joy in offering a homemade treat, especially one as universally loved as these. We encourage you to try this recipe, experiment with your favorite mix-ins, and make these cookies truly your own. When you do, we’d love to see your creations! Share your pictures and stories with us on social media using #MyMonsterCookies. Happy baking, and may your cookie jar always be full!