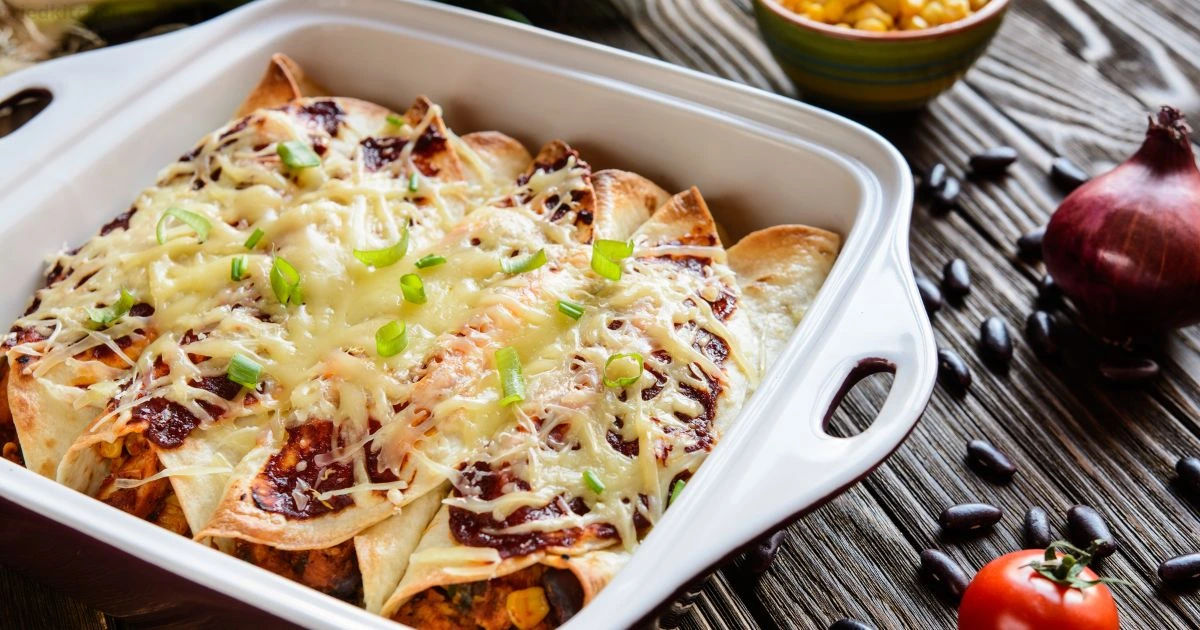
How to Make the Perfect Chicken Enchilada Recipe at Home
An Ode to the Perfect Pan of Enchiladas
Table of Contents
There’s a certain kind of magic that unfolds in the kitchen when you decide to make enchiladas from scratch. It’s a culinary alchemy that transforms simple ingredients into a dish that resonates with warmth, comfort, and a deep sense of satisfaction. Imagine the scene: a rich, crimson sauce simmering gently on the stovetop, its spicy, earthy aroma weaving through your home, a promise of the feast to come. Picture the sizzle of corn tortillas, kissed by hot oil just long enough to become pliable, ready to be filled with a savory mixture of tender chicken and melting cheese. This isn’t just about following a recipe; it’s about creating an experience.
This guide is your invitation to craft those moments in your own kitchen. It’s for those evenings when you crave more than just food; you crave a feeling. The feeling of gathering your favorite people around the table, the joyous clatter of forks against plates, the shared smiles over a meal made with love. This chicken enchilada recipe is your key to unlocking that experience. Forget the bland, store-bought kits. We’re going to walk you through creating a pan of enchiladas so profoundly flavorful, so authentically delicious, you’ll wonder why you ever settled for less. Get ready to create a dish that will become a treasured part of your culinary repertoire.
Crafting the Best Chicken Enchilada Recipe: What You’ll Need
The journey to exceptional chicken enchiladas begins with sourcing the right ingredients. The soul of this dish lies in the quality of its components, particularly the chiles for the sauce. Here, we’ve laid out everything you’ll need, with notes to guide you in making the best choices for a truly memorable meal.
For the Authentic Red Enchilada Sauce:
The heart of any great enchilada is its sauce. Moving beyond simple chili powder will elevate your dish from good to unforgettable. Dried chiles offer a complexity of flavor that is simply unmatched.

| Ingredient | Quantity | Notes |
| Dried Ancho Chiles | 4 | Stems and seeds removed. These provide a deep, fruity, and slightly smoky flavor. |
| Dried Guajillo Chiles | 2 | Stems and seeds removed. These bring a brighter, tangier note with a hint of berry. |
| White Onion | 1/2 | Roughly chopped. White or yellow onions work best for their mild sweetness. |
| Garlic Cloves | 3 | Peeled. Feel free to add another clove or two if you’re a garlic lover. |
| Roma Tomatoes | 2 | Halved. Their lower water content makes for a richer, less watery sauce. |
| Chicken Broth | 4 cups | Low sodium recommended, so you can control the saltiness of the final dish. |
| Mexican Oregano | 1 tsp | This variety has a more floral, citrusy flavor than its Mediterranean cousin. |
| Cumin | 1 tsp | For that classic, earthy warmth that is so characteristic of Mexican cuisine. |
| Salt | To taste | Start with a teaspoon and adjust as needed. |
| Black Pepper | To taste | Freshly ground is always best for a more potent flavor. |
For the Savory Chicken Filling:
The filling for your enchiladas should be moist, flavorful, and generously seasoned. Here’s how to create a filling that perfectly complements the rich red sauce.
| Ingredient | Quantity | Notes |
| Cooked Chicken | 3 cups | Shredded. A store-bought rotisserie chicken is a fantastic time-saver. |
| Onion | 1/2 cup | Finely chopped. This adds a subtle sweetness and texture. |
| Garlic | 2 cloves | Minced. Fresh garlic is non-negotiable for a vibrant flavor. |
| Monterey Jack Cheese | 1 cup | Shredded. This cheese melts beautifully, creating a creamy, gooey filling. |
| Cilantro | 1/4 cup | Freshly chopped. For a burst of fresh, citrusy flavor. |
For Assembly:
The final touches are what bring your enchiladas to life. These ingredients will be used to build your masterpiece and garnish it to perfection.
| Ingredient | Quantity | Notes |
| Corn Tortillas | 12 | Corn tortillas are traditional and hold up better to the sauce than flour. |
| Vegetable Oil | For frying | Just enough to lightly fry the tortillas. Canola or grapeseed oil also works. |
| Monterey Jack Cheese | 2 cups | Shredded, for topping. You can also use a blend of Monterey Jack and cheddar. |
| Cotija Cheese | 1/2 cup | Crumbled, for garnish. This aged cheese adds a salty, savory finish. |
| Crema or Sour Cream | For garnish | To add a cool, creamy counterpoint to the spicy sauce. |
| Sliced Black Olives | For garnish | A classic enchilada topping that adds a briny bite. |
| Chopped Cilantro | For garnish | For a final touch of freshness and color. |
| Sliced Avocado | For garnish | Creamy avocado is the perfect partner for the rich flavors of the enchiladas. |
Step-by-Step Guide to the Perfect Chicken Enchiladas
Now that you have your ingredients assembled, it’s time for the fun part. Follow these detailed steps, and you’ll be well on your way to creating a pan of chicken enchiladas that will have everyone singing your praises.
Part 1: Creating the Rich and Flavorful Red Enchilada Sauce
This is where the magic truly begins. Your homemade enchilada sauce will be the star of the show.
- Awaken the Chiles: Start by toasting the dried ancho and guajillo chiles in a dry skillet over medium heat. This step is crucial and should not be skipped. Toast them for about 30 to 60 seconds per side. You’ll know they’re ready when they become fragrant and slightly more pliable. Be very careful not to burn them, as this will make your sauce bitter.
- Soak and Soften: Once toasted, place the chiles in a heatproof bowl and cover them with hot water. Let them soak for 20 to 30 minutes, or until they are soft and rehydrated.
- Char the Aromatics: While the chiles are soaking, use the same skillet to sauté the chopped onion, garlic cloves, and halved Roma tomatoes. Cook them until they are softened and have some nice charred spots. This charring adds another layer of smoky depth to your sauce.
- Blend to Perfection: Transfer the soaked chiles (discard the soaking water), the charred vegetables, and 2 cups of the chicken broth to a high-powered blender. Add the Mexican oregano and cumin. Blend on high until the mixture is completely smooth. This may take a minute or two.
- Simmer and Season: Pour the blended sauce through a fine-mesh sieve into a saucepan. Use a spatula to press all the liquid through, leaving the solids behind. This step ensures a silky-smooth sauce. Let the sauce simmer over medium-low heat for about 20 minutes. This allows the flavors to meld and deepen. Stir in the remaining 2 cups of chicken broth, and season with salt and pepper to your liking.
Part 2: Preparing the Delicious Chicken Filling
While your sauce is simmering, you can prepare the chicken filling.
- In a large bowl, combine the shredded chicken, finely chopped onion, minced garlic, 1 cup of shredded Monterey Jack cheese, and the freshly chopped cilantro. Mix everything together until it’s well combined. Take a little taste and add a pinch of salt if you think it needs it.
Part 3: Assembling Your Homemade Chicken Enchiladas
This is where all your hard work comes together. Prepare your assembly line: the baking dish, the skillet for frying tortillas, your bowl of filling, and the saucepan of warm sauce.
- Prepare the Tortillas: Pour about a half-inch of vegetable oil into a small skillet and heat it over medium heat. Once the oil is hot, carefully fry each corn tortilla for about 10-15 seconds per side. You’re not looking to make them crispy, just to make them pliable and to enhance their corn flavor. This step is key to preventing them from falling apart when you roll them. Place the fried tortillas on a plate lined with paper towels to drain any excess oil.
- Dip, Fill, and Roll: Now for the rhythmic process of building your enchiladas. Dip each fried tortilla into the warm enchilada sauce, making sure it gets a good coating on both sides. Lay the sauced tortilla on a clean plate or work surface. Spoon a generous amount of the chicken filling down the center of the tortilla. Roll it up snugly and place it seam-side down in a 9×13 inch baking dish. Repeat this process until you’ve used all the filling and tortillas.
- Sauce and Cheese It Up: Once your baking dish is filled with neatly rolled enchiladas, pour the remaining enchilada sauce evenly over the top. Make sure every enchilada gets a good drenching. Then, sprinkle the remaining 2 cups of shredded Monterey Jack cheese over the sauced enchiladas.
- Bake to Bubbly Perfection: Place the baking dish in an oven that has been preheated to 375°F (190°C). Bake for 20 to 25 minutes. You’ll know it’s ready when the sauce is bubbling around the edges and the cheese on top is completely melted and has started to turn a beautiful golden brown.
Tips for the Ultimate Chicken Enchilada Experience
Here are a few insider tips to ensure your chicken enchilada recipe is a resounding success every single time.
- Don’t Fear the Dried Chiles: If you’re new to using dried chiles, don’t be intimidated. They are the secret to an authentic and deeply flavorful sauce. The process of toasting and rehydrating them is simple and well worth the effort.
- Grate Your Own Cheese: Pre-shredded cheeses are often coated in powders like cellulose to prevent them from clumping. This coating can prevent the cheese from melting as smoothly as freshly grated cheese. Take the extra minute to grate your own; you’ll notice the difference in the creamy, gooey texture.
- Give Them a Rest: As tempting as it is to dig in the moment they come out of the oven, let your enchiladas rest for about 5 to 10 minutes. This allows them to set up a bit, making them easier to serve and preventing them from falling apart on the way to the plate.
- Customize Your Sauce Consistency: If you find your sauce is too thick, you can thin it out with a little more chicken broth. If it’s too thin, let it simmer for a little longer to reduce and thicken.
- Taste as You Go: This is a fundamental rule of cooking. Taste your sauce and your filling at different stages and adjust the seasonings as needed. This ensures the final dish is perfectly balanced to your taste.
Delicious Variations on the Classic Chicken Enchilada Recipe
Once you’ve mastered this classic chicken enchilada recipe, you can start to get creative. Here are a few delicious variations to try.
- Chicken Enchiladas Verdes: For a tangier, brighter flavor profile, swap out the red enchilada sauce for a green one. You can make a homemade salsa verde with tomatillos, jalapeños, cilantro, and onion, or find a high-quality store-bought version.
- Creamy Chicken Enchiladas: To add a luxurious, creamy texture to your dish, stir a half cup of sour cream or Mexican crema into your red enchilada sauce just before you pour it over the rolled tortillas. This variation is particularly kid-friendly.
- Spicy Chicken Enchiladas: If you like a bit of heat, you can easily dial up the spiciness of this recipe. Add a chopped jalapeño or serrano pepper to the blender when you’re making the sauce. You could also add a pinch of cayenne pepper or a dash of your favorite hot sauce to the chicken filling.
- Smoky Chipotle Chicken Enchiladas: For a smoky twist, add one or two chipotle peppers in adobo sauce to your blender when making the red sauce. These smoked and dried jalapeños will impart a deep, smoky flavor that is incredibly delicious.
Conclusion: Your New Favorite Family Dinner
You’ve done it. You’ve navigated the journey from simple ingredients to a stunning pan of homemade chicken enchiladas. This recipe is more than just a meal; it’s a testament to the joy of cooking from scratch and the power of a shared meal to bring people together. The rich, complex sauce, the savory chicken filling, the gooey melted cheese – every bite is a reward for the love and care you’ve put into this dish.
We hope this chicken enchilada recipe becomes a staple in your home, a go-to for family dinners, potlucks, and any occasion that calls for a little extra comfort and a lot of flavor.
Now, we’d love to hear from you! Did you make this recipe? Do you have your own special tips or variations? Share your experience in the comments below. Better yet, snap a photo of your beautiful enchiladas and tag us on social media! We can’t wait to see what you’ve created.
Frequently Asked Questions (FAQ) About Our Chicken Enchilada Recipe
H4: What is the best type of chicken to use for this chicken enchilada recipe?
For this chicken enchilada recipe, we’ve found that a store-bought rotisserie chicken offers the best combination of flavor and convenience. The meat is already cooked, seasoned, and incredibly moist. However, you can absolutely use chicken you’ve cooked yourself. Boiling or poaching chicken breasts or thighs until they are cooked through and then shredding them with two forks is a great alternative.
Can I make this chicken enchilada recipe ahead of time?
Absolutely! This recipe is perfect for making ahead. You can assemble the enchiladas completely, cover the baking dish tightly with aluminum foil, and store it in the refrigerator for up to 24 hours. When you’re ready to bake, you may need to add about 10 minutes to the baking time to ensure they are heated all the way through.
How do I store and reheat leftover chicken enchiladas?
Store any leftover chicken enchiladas in an airtight container in the refrigerator. They will stay fresh and delicious for up to 3 days. To reheat, you can warm individual portions in the microwave. For a larger amount, it’s best to cover the baking dish with foil and reheat it in a 350°F (175°C) oven for about 15-20 minutes, or until warmed through.
Can I use flour tortillas instead of corn tortillas for this recipe?
While corn tortillas are the traditional choice for enchiladas due to their flavor and texture, you can certainly use flour tortillas if you prefer. Be aware that flour tortillas tend to be softer and may become a bit more tender or even slightly mushy when soaked in the sauce. You can skip the step of frying the flour tortillas, as they are already pliable enough to roll.
Why did my corn tortillas break when I rolled them?
This is a common issue, and it’s almost always because the tortillas were not properly heated before rolling. Lightly frying the corn tortillas in a bit of hot oil, as instructed in the recipe, makes them more pliable and resilient. Dipping them in the warm enchilada sauce also helps to soften them. If you’re still having trouble, you can try warming a stack of tortillas wrapped in a damp paper towel in the microwave for about a minute.